Page 131 - THREADING CATALOG
P. 131
±0.025             5
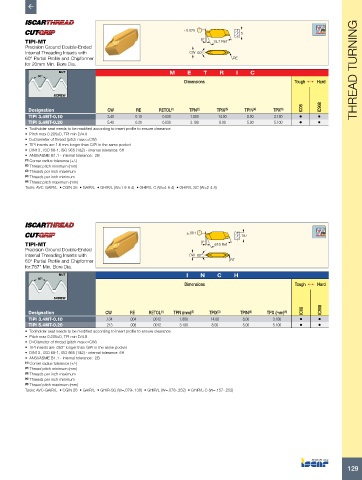
          TIPI-MT                                                    8°  15.7 Ref
          Precision Ground Double-Ended
             Internal Threading Inserts with                     CW  60°
          60° Partial Profile and Chipformer                                   RE
          for 20mm Min. Bore Dia.
                     NUT                                  M     E     T    R     I   C                                   THREAD TURNING
              60°
                                                               Dimensions                           Tough 1   Hard

                   SCREW
           Designation               CW        RE      RETOL (1)  TPN (2)  TPIX (3)  TPIN (4)  TPX (5)  IC08  IC908
           TIPI 3.4MT-0.10           3.40      0.10     0.030    1.800     14.00    8.00     3.180    •     •
           TIPI 5.4MT-0.20           5.40      0.20     0.030    3.190     8.00     5.00     5.100    •     •
          •  Toolholder seat needs to be modified according to insert profile to ensure clearance
          •  Pitch max 0.205xD, TPI min D/4.8
          •  D=Diameter of thread (pitch max<=CW)
          •  TIPI inserts are 1.6 mm longer than GIPI in the same pocket
          •  DIN13 , ISO 68-1, ISO 965 (1&2) - internal tolerance: 6H
          •  ANSI/ASME B1.1 - internal tolerance:  2B
          (1)  Corner radius tolerance (+/-)
          (2)  Thread pitch minimum (mm)
          (3)  Threads per inch maximum
          (4)  Threads per inch minimum
          (5)  Thread pitch maximum (mm)
          Tools: AVC-GAIR/L  • CGIN 26  • GAIR/L  • GHIR/L (W=1.9-6.4)  • GHIR/L-C (W=4-6.4)  • GHIR/L-SC (W=2-4.8)


                                                                ±.001             .197

          TIPI-MT                                                    8°  .618 Ref
          Precision Ground Double-Ended
          Internal Threading Inserts with                        CW 60°
          60° Partial Profile and Chipformer                                   RE
          for.787" Min. Bore Dia.
                     NUT                                        I    N    C     H
              60°
                                                               Dimensions                           Tough 1   Hard

                   SCREW

           Designation               CW      RE    RETOL (1)  TPN (mm) (2)  TPIX (3)  TPIN (4)  TPX (mm) (5)  IC08  IC908
           TIPI 3.4MT-0.10           .134    .004    .0012    1.800     14.00      8.00      3.180    •     •
           TIPI 5.4MT-0.20           .213    .008    .0012    3.190     8.00       5.00      5.100    •     •
          •  Toolholder seat needs to be modified according to insert profile to ensure clearance
          •  Pitch max 0.205xD, TPI min D/4.8
          •  D=Diameter of thread (pitch max<=CW)
          •  TIPI inserts are .063" longer than GIPI in the same pocket
          •  DIN13 , ISO 68-1, ISO 965 (1&2) - internal tolerance: 6H
          •  ANSI/ASME B1.1 - internal tolerance:  2B
          (1)  Corner radius tolerance (+/-)
          (2)  Thread pitch minimum (mm)
          (3)  Threads per inch maximum
          (4)  Threads per inch minimum
          (5)  Thread pitch maximum (mm)
          Tools: AVC-GAIR/L  • CGIN 26  • GAIR/L  • GHIR-SC (W=.079-.138)  • GHIR/L (W=.078-.252)  • GHIR/L-C (W=.157-.252)


                                                                                                                      129

